
Some time ago I had to connect a device to my network that could be only connected via network wire. Unfortunately there was no access to a switch or something similar nearby. But my network (of course) has a wifi access point that my device could connect to if it would have a wifi adapter.
So how could I connect my device to the network as if it was connected by wire? It should behave just like a normal network client and for example get an ip address via DHCP, have the ability to connect to other LAN clients etc.
Solution is easy & very cheap. A (almost) transparent LAN/WLAN bridge!
Read on to see how you could setup such a bridge easily using a GUI (LuCI).
Notes
What we setup here is basically a routed client as described here: https://wiki.openwrt.org/doc/recipes/relayclient. It is called a pseudobridge in the article because technically it is a router pimped by some software to act like a bridge.
Whenever I refer to the ‘router’ I mean the TP-Link TL-WR841N device we are working on and not some router that may exist in your network.
Hardware
For my solution I use the very cheap and simple router TP-Link TL-WR841N. On this device you can easily install the custom firmware that we will need.
The TL-WR841N I am using here works pretty well for this setup but is not recommended by OpenWrt anymore due to low flash/ram. So in case you want to upgrade to a newer version of OpenWrt in the future choose a device with more flash/ram.
Prerequisites
In order to be able to do the setup you need a few things:
- A working access point that has access to the internet
- A desktop/notebook with an SSH client (e.g. PuTTY)
- A network cable to connect desktop/notebook to the router
1. Install custom firmware (OpenWrt) on router
There are many very good tutorials how to install the custom firmware OpenWrt on a TL-WR841N. Therefore I am not describing this step.
I recommend sticking with the install instructions on the OpenWrt-Website, which in my case was: https://openwrt.org/toh/tp-link/tl-wr841nd#installation
For this tutorial I used release 18.06.04 of OpenWrt.
2. Reset (optional)
If you just installed the custom firmware you may ommit this step. But if you already twiddled with it or need to reset because you messed something up, just do this:
- Power off the device
- Remove all cables (except the power cable of course)
- Press the reset button and keep it pressed
- Power on the device (keep the reset button pressed)
- Watch the status LEDs (keep the reset button pressed)
- The lock LED turns on (keep the reset button pressed)
- The lock LED turns off (keep the reset button pressed)
- The lock LED starts blinking (keep the reset button pressed)
- The lock LED starts to illuminate constantly
- Immediately release the reset button
- The device now resets to OpenWrt default configuration. During this process all LEDs may blink
- Wait till the lock LED illuminates constantly again
Now your device is reset to OpenWrt defaults and we can start to configure our LAN/WLAN bridge.
3. First steps
- Connect your desktop/laptop via network cable to the router using port 1
- Ensure, that your computer isn’t connected to any other network, e.g. via WLAN
- On your computer enable DHCP for your ethernet device
- On your computer open a browser window and visit http://192.168.1.1 which is the GUI/frontend of your OpenWrt router
- Initially there is no password set, so be sure there is no password in the password field and click Login
4. Set your password
- In the menu go to System/Adminstration
- Choose a password and enter it in the fields Password and Confirmation
- At the bottom of the page press Save & Apply
5. Set the ip address of your router
Your router needs to have an ip address that is outside of your LAN. Otherwise the bridging will not work. This will also be the address you have to use when you need to configure your router. So just choose an ip address that you normally never would use and you are save 😉
I chose 192.168.15.1 for my router as the whole subnet 192.168.15.0/24 isn’t yet used. If you choose another address remember to replace 192.168.15.1 in every part of this guide.
- In the menu go to Network/Interfaces
- For the interface LAN click on action Edit
- In the field IPv4 address enter your new ip address, in my case 192.168.15.1
- Because the bridge should be transparent, we have to disable the DHCP server. Therefore find the DHCP section and check the Ignore Interface option
- Click Save & Apply
- In current versions of OpenWrt you get a “Configuration has been rolled back!” alert which is because of the changed ip address your browser and the router cannot communicate anymore. This is perfectly normal. Please just click Apply unchecked and wait till the (also normal) “Device unreachable” message appears.
From now on your router is reachable with its new address 192.168.15.1. Because we disabled the DHCP server your computer will not get a new ip address automatically. You have to set it manually now:
- Give your computer a new ip address that belongs to the new subnet. I gave the ethernet adapter of my notebook the ip address 192.168.15.2 and netmask 255.255.255.0
To resume configuration you have to reconnect to the router now.
- In your web browser go to http://192.168.15.1 which is the new URL of the router frontend
- Login in with username root and your password
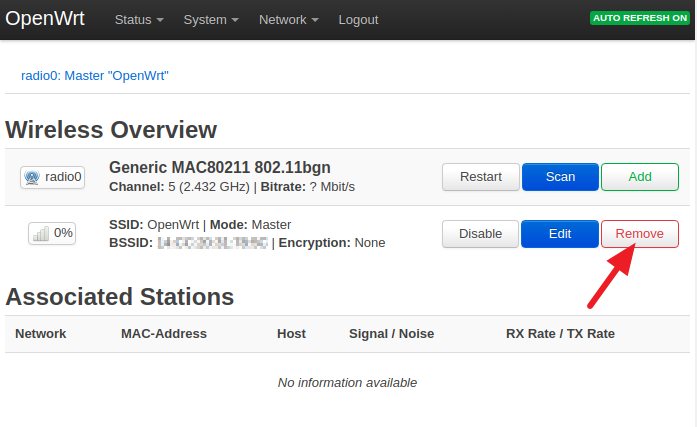
6. Remove unneeded wireless connection
 As we don’t want the router to work as an access point we have to delete the automatically generated wireless connection.
- In the menu go to Network/Wireless
- Find the connection with SSID “OpenWrt” and mode “Master”.
- Click Remove
- Confirm removal in the popped up dialog
7. Connect router to your WLAN
- In the menu go to Network/Wireless
- Click Scan in the upper right
- When the scan is finished choose the network you want to join and click Join Network
- In the appearing dialog enter the passphrase of the WLAN you want to join
- Click Submit
- Click Save & Apply
 If everything went well, your router should now be connected to your network and have access to the internet. This can be checked easily:
- Go to Network/Diagnostics
- Click on Ping
If the ping was successful it should result in something like shown on the right.
8. Install relayd on router
- With the SSH client of your choice (e.g. PuTTY) connect to your router using ip address 192.168.15.1. Rember to connect as user root. In linux for example you would have to connect like
ssh root@192.168.15.1
- Enter the password you set for OpenWrt in step 4
- Do an pkg update:
opkg update
- Install relayd
opkg install relayd
- Install relayd protocol for LuCI
opkg install luci-proto-relay
- Activate relayd:
/etc/init.d/relayd enable
- End SSH session:
exit
9. Configure bridge via web GUI
 Open your browser and visit http://192.168.15.1 again.
- Login in with username root and your password
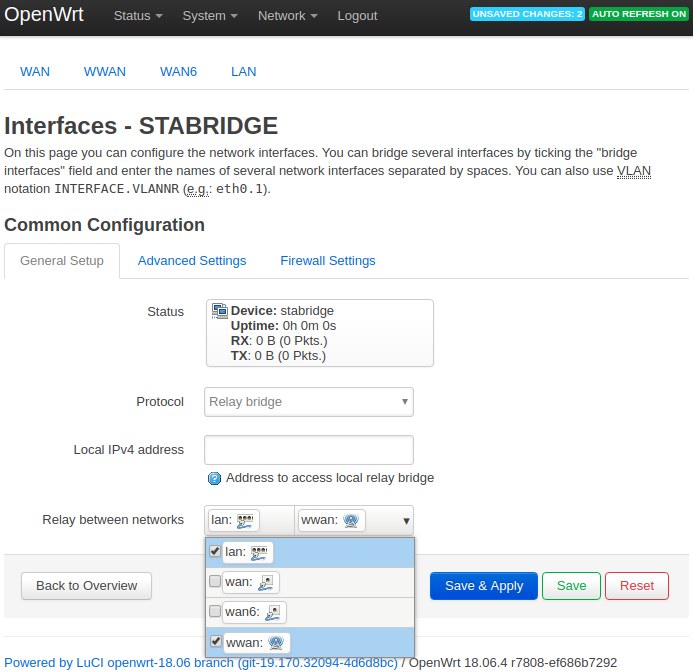
- In the menu go to Network/Interfaces
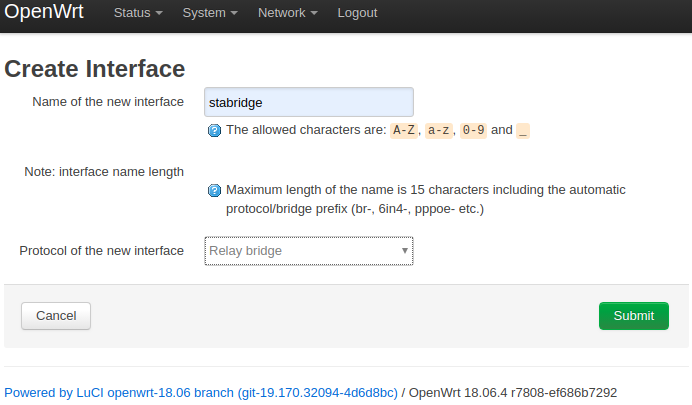
- Click Add new interface
- In the Name of the new interface field enter stabridge
- In the Protocol of the new interface dropdown choose Relay bridge
- Click Submit
- In the Relay between networks section check lan: and wwan:
- Click Save & Apply
10. Adjusting firewall rules
 In the menu go to Network/Firewall
- In the Zones section Add
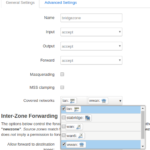
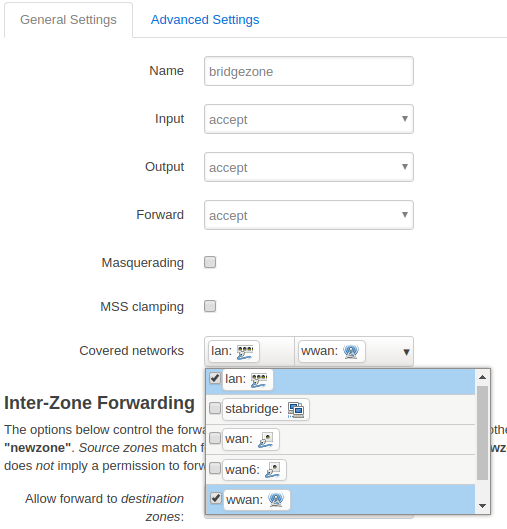
- In the Name field enter bridgezone
- In the Forward dropdown choose accept
- In the Covered networks section check lan: and wwan:
- Anything else stays unchanged
- Click Save & Apply
11. Restart router and test
- In the menu go to System/Reboot
- Click Perform reboot
Your setup is now finished. Any device that is connected to a port of the router (except the WAN port) should now behave like it would be directly connected to the LAN by wire.
To test this with my notebook I did the following steps:
- Disabled my wifi adapter
- Set my ethernet connection back to DHCP
The result is that my central DHCP server gave me a new ip address and I have full access to the internet and all devices in my local network.
Exactly what I wanted. This way I can extend my network to wire-only devices even when there is no network socket available.
Mission complete 🙂
Closing remarks
Remember that the configured router has the static ip address 192.168.15.1 which is very likely not reachable in the local network, e.g. because it has subnet 192.168.1.0/24. If you want to access the router itself, e.g. to make changes to the configuration like connecting to a different wifi network you would have to set the ip of your computer to 192.168.15.2 so it would be able to connect to 192.168.15.1. Additionally the router is configured to ask for an own ip address via DHCP (via interface WWAN). So you may lookup the address and connect to that ip. This works from any device in the network but the ones that are connected directly to the ports of the router.
Was this article helpful?
Consider buying me a coffee to keep my brain fueled 🙂
excellent, it works!
well done.
After 6 hours of struggling to get my bridge working I found your site….15 minutes later I was on the air….bravo!
Been struggling to get this to work on my TP-Link TL-WA701ND. After many hours of tinkering i threw in the towel and googled it. Your instructions were very clear and had my setup up and running in less than 5 minutes (i had already installed openwrt a while back). Thanks a lot for sharing.
Perfect this works! searched everywhere before but found nothing (incl. the OpenWrt page – maybe you can hand this in to them)
Anyone know if the wireless ap on the bridged router will work in this set up?
Worked like a charm, Made it simple. Thanks
I can’t get the relay protocol to appear in the list, even after installing relayd and luci. The router in question is a Linksys EA4500 v1–could it be because it’s not supported?
Try and check either from GUI or SSH to see the list of packages install. It is possible that your router may not have enough space and the install didn’t happen. Also if you managed to flash the OpenWRT properly you can always reset using reset button in the router. It won’t remove the OpenWRT
once you install relayd, try restarting router. It happened in my case, once relayd was installed it was not showing in protocol list. Once i rebooted the router it appeared in the list.
Hi all,
I have a TIM HUB (TECHNICOLOR DGA 4132 (AGTHP)) as my main modem/router and a TP-link RE450 dual-band wireless range extender with Gigabit ethernet port where it is attached a Synology DS218J NAS. I installed openwrt on the range extender and configured a wireless bridge as described here:
https://openwrt.org/docs/guide-user/network/wifi/relay_configuration
https://www.nerd-quickies.net/2019/08/20/setup-lan-wlan-bridge-with-openwrt-luci/
but I have a problem on setting port-forwarding on the modem because I can’t see NAS mac address but only the range extender mac address: is there any way to properly configure openwrt so I can see the correct NAS mac address from the modem/router?
Thanks in advance,
Marco
Perfekt Job. I´ve don it 🙂
Excellent job! I want to connect my laserjet printer (with only wired network card) to my wireless router with wr841n, the official openwrt site recommend using client+wds mode, but I am afraid in that mode the printer may behind a NAT subnet. In fact I only want a transparent bridge. With this set up I can use the printer from my phone, pc and even from the internet without any problem.
A wonderful guide.
Works perfectly.
Did this on my TP-Link AC1750 Archer C7v2. Worked flawlessly. Now I can get my Apple IIe online via my Uthernet II card over ethernet.
Thank you very much!
Perfect guide, it worked like a charm!
Thank you for this great guide! I had already found similar instructions on the OpenWRT website, but couldn’t make it work. You translated it into plain English that even I can understand. 🙂
The main reason why I didn’t succeed before was that whenever it said “settings couldn’t be applied, revert changes?”, I thought that meant the settings were really *wrong*, as in “inapplicable”. So I always reverted them instead of applying anyway. Your guide made it clear – works like a charm! 👍🏻
Thanks!
I had to add “stabridge” to the covered firewall networks to make it work for me.
Fantastic – thanks a lot!
Awesome post. Works perfectly on my Raspberry Pi 3B+. Thank you for posting this information.
What to do to make IPv6 work?
Thank you! Worked great and it solved a million problems. My Archer c7 performed terribly with default firmware and settings now it is a wifi bridge on steroids. Had to add the DNS server manually (LAN) to successfully diagnose settings (ping) and had to reboot the device before I could select “relay bridge”. Am buying you coffee for sure.
I am very happy to hear that it worked for you. And thank you very much for the coffee 🙂
Great post. I did this for two C7 v5. First one went flawlessly, the second not so much. Despite being the same hardware revisions, same exact firmware file, the second C7 was not able to connect to my main ISP router. A bit of digging and found through “logread” that the wpa_supplicant was failing.
In case anyone else runs into this with the C7 v5.
Checking under /etc/config/wireless and /var/run/wpa_supplicant*.conf couldn’t see the key/psk respectively, despite having set it through the GUI initially.
After a couple reboots, resets, and attempts at setting the WPA2-PSK through the GUI without sticking, the trick was setting it through uci. Immediately stuck, connected to my ISP router, and the rest of the process went smoothly.
uci set wireless.wifinet0.key=”your_password”
uci commit wireless
To be able to access the router on 192.168.15.1 while not connected to the 192.168.15.x network but on 192.168.1.x you may go to the “stabridge” interface and there, set the “Local IPv4 address” to the IP of the WWAN interface.
I tried that and it did not work
Here’s a version for advanced users on the same topic: https://wiki.terrabase.info/wiki/WRT_Router_Series_Wireless_Client_Bridge_Mode_with_OpenWRT
Excellent article. I was able to configure my NetGear R6220 in about 15minutes and it worked immediately. It is a stable solution and easy to maintain. Perfect for my case. Thanks a lot.
Now it replaces my damaged NetGear WNCE4004 (NetGear used a modified openWRT on this device anyway, maybe even same approach as described here).
This post is an absolute time saver. Don’t EVER delete it! 🙂
I’m new to Openwrt. I was struggling setting a wds up for a while. Thank you for your explanations. It’s very accurate and to the point.
Keep up the good work.
once you install relayd, try restarting router. It happened in my case, once relayd was installed it was not showing in protocol list. Once i rebooted the router it appeared in the list.
Excellent article. Works fine on Maginon WLR-755 AC.
Keep on with your work!
Many thanks.
You saved my day, after hours of searching online
5. Set the IP address of your router
Changing the LAN IP is better done via Putty or the Linux ‘terminal’ interface(in the nemu > accessories > ‘terminal’ interface. On mu Ubuntu 14.04.6 I have an app the stores 30 cut/paste strings. I copied and pasted this into the command line
# SSH root@192.168.1.1
user:root
Login:
[ci set network.lan.ipaddr=’10.0.0.1′ ; uci commit network ; service network restart]
My man. Youre great.save my day.normal bridged wifi setup for openwrt not enough for printing.but with youre forward firewall rule works like a charm! Thanks a lot!
I was really hoping that these directions would make my router running OpenWRT a WiFi repeater/signal extender but that does not seem to be the case. ☹ I’m assuming having followed these directions that I could now plug a device into an Ethernet port on the router and that it would allow me to wirelessly have an Ethernet connection but this is not functionality that I need. I am simply trying to boost/extend my existing WiFi signal and make it spread across a wider coverage area throughout my home. I have several peripheral devices such as Wi-Fi cameras and Amazon Echo devices that were not quite getting a strong enough signal but I have the router properly configured following the directions from this article and have it plugged in right next to these devices and their signal has not improved whatsoever ☹
It’s so annoying that the main setup guide from the OpenWRT User Documentation page points to an article with a giant warning at the top saying that the directions probably won’t work and that I should now use a different/experimental method but then gives very little detail. https://openwrt.org/docs/guide-user/network/wifi/relay_configuration
I followed every step in this guide exactly, except for one small detail of step 5 (setting the router to have an IP address that is outside of my LAN) using the GUI. Whenever I used the GUI to do this it would not save completely and then would lock me out of the router and I lost router access altogether and had to press the reset button and start anew. I researched and found that this is a common problem with the current version of OpenWRT firmware and the recommendation was to use SSH and the command line to change the base IP address and so I did this and it worked fine.
Thanks, first usage openwrt on old TL-WR740N and all works!
son zamanlarda gördüğüm en iyi anlatım, 2 gündür uğraşıyordum bu sayfaya denk geldim 15dk da işlem tamam.
can i use one device as wifi->lan bridge AND “repeater” (wifi->wifi-bridge)?
Followed the steps and it works! I only have one problem, the speed (speedtest) is low, if I connect the Laptop directly to the router (WIFI) the speed is 300/300mb, If I disable WIFI and use Ethernet the speed drops to 110/60mb…..
Thanks worked a charm, OpenWrt guide pages were out of date but these instructions worked for an TPLINK RE200 (v1) running OpenWRT v21.
I can echo the results of some others that the speed is about half. I assume the bridge mode is responsible for that.
Immediately after adding the client Wi-Fi connect to my main AP (i.e. before the bridge config) I got the full internet speed of my AP.
After completing the install it was half my AP’s maximum.
THANK YOU!
Wish I had found your guide before I wasted several hours trying to get it to work on my own and then trying another guide that was missing crucial steps that yours had.
Thank you very much!
This was exactly what I was missing.
Great tutorial, if someone else is struggling with
the default route missing, I skipped the step 6
and connected right away to my uplink AP.
That was a mistake. Somehow then only the route to the
local subnet gets set.
Thanks again!
Thank you very much for your efforts creating this tutorial! I configured a Netgear WAC124 to act as a pseudobridge this way, and it works like a charm!
In the meantime there is a newly released (June 2024) official OpenWRT tutorial which basically covers the same steps (https://openwrt.org/docs/guide-user/network/wifi/relay_configuration) as you did, just for information of the readers.-
I configured the “local IPv4 address” of the newly created bridge interface to be the same one as the DHCP-leased address of the WLAN interface “wwan”, so I don’t have to change the subnet configuration of any computer to have management access to the OpenWRT device.
Obviously, this only makes sense if one reserves the DHCP lease for this device on the DHCP server (e.g. the home Internet router) or assigns a static IP address to the “wwan” interface.
I’m missing only one hint from the guide – missing from OpenWrt’s guide too -, that in the Firewall Zone the “Masquerading” must be enabled on LAN zone – that’s not enabled in default -, otherwise the internet access will not be available on the connected clients.
(I followed everything from both of the guides but I got stuck and I had no internet access at the clients at all.. Finally as a novice user I figured out that what is the problem.)
Thanks man! Awesome. Works perfectly.
I have done this after your manual on my TL-WR902AC mini router. Worked exactly as described. You just missed to describe that a reboot of the router is required after step 8 but did not cost me any time.
This helped me to bridge my heating to the internet.