
Recently I had to connect a device to my network that could be only connected via network wire. Unfortunately there was no access to a switch or something similar nearby. But my network (of course) has a wifi access point that my device could connect to if it would have a wifi adapter.
So how could I connect my device to the network as if it was connected by wire? It should behave just like a normal network client and for example get an ip address via DHCP, have the ability to connect to other LAN clients etc.
Solution is easy & very cheap. A (almost) transparent LAN/WLAN bridge!
Read on to see how you could setup such a bridge easily even using a GUI (LuCI) most of the times.
A new version of this guide is available!
This post is older than 2 years now and some parts seemed to be a bit outdated. But as interest in this topic is still very high I decided to publish a more up to date version.
Please find it here: https://www.nerd-quickies.net/2019/08/20/setup-lan-wlan-bridge-with-openwrt-luci/
Notes
What we setup here is basically a routed client as described here: https://wiki.openwrt.org/doc/recipes/relayclient. It is called a pseudobridge in the article because technically it is a router pimped by some software to act like a bridge.
Whenever I refer to the ‘router’ I mean the TP-Link TL-WR841N device we are working on and not some router that may exist in your network.
Hardware
For my solution I use the very cheap and simple router. On this device you can easily install the custom firmware that we will need.
Prerequisites
In order to be able to do the setup you need a few things:
- A working access point that has access to the internet
- A desktop/notebook with an SSH client (e.g. PuTTY)
- A network cable to connect desktop/notebook to the router
- Find the link for the LuCI relay protocol we need in step 7 on https://downloads.openwrt.org/. For me it was https://downloads.openwrt.org/chaos_calmer/15.05.1/ar71xx/generic/packages/luci/luci-proto-relay_git-16.018.33482-3201903-1_all.ipk
1. Install custom firmware (OpenWrt) on router
There are many very good tutorials how to install the custom firmware OpenWrt on a TL-WR841N. Therefore I am not describing this step.
I recommend sticking with the install instructions on the OpenWrt-Website, which in my case was: https://wiki.openwrt.org/toh/tp-link/tl-wr841nd#installation
2. Reset (optional)
If you just installed the custom firmware you may ommit this step. But if you already twiddled with it or need to reset because you messed something up, just do this:
- Power off the device
- Remove all cables (except the power cable of course)
- Press the reset button and keep it pressed
- Power on the device (keep the reset button pressed)
- Watch the status LEDs (keep the reset button pressed)
- The lock LED turns on (keep the reset button pressed)
- The lock LED turns off (keep the reset button pressed)
- The lock LED starts blinking (keep the reset button pressed)
- The lock LED starts to flash constantly
- Immediately release the reset button
- The device now resets to OpenWrt default configuration. During this process all LEDs may blink
- Wait till the lock LED flashes constantly again
Now your device is reset to OpenWrt defaults and we can start to configure our LAN/WLAN bridge.
3. First steps
- Connect your desktop/laptop via network cable to the router using port 1
- Ensure, that your computer isn’t connected to any other network, e.g. via WLAN
- On your computer enable DHCP for your ethernet device
- On your computer open a browser window and visit http://192.168.1.1 which is the GUI/frontend of your OpenWrt router
- Initially there is no password set, so be sure there is no password in the password field and click Login
4. Set your password
- In the menu go to System/Adminstration
- Choose a password and enter it in the fields Password and Confirmation
- At the bottom of the page press Save & Apply
5. Set the ip address of your router
Your router needs to have an ip address that is outside of your LAN. Otherwise the bridging will not work. This will also be the address you have to use when you need to configure your router. So just choose an ip address that you normally never would use and you are save 😉
I chose 192.168.15.1 for my router as the whole subnet 192.168.15.0/24 isn’t yet used. If you choose another address remember to replace 192.168.15.1 in every part of this guide.
- In the menu go to Network/Interfaces
- For the interface LAN click on action Edit
- In the field IPv4 address enter your new ip address, in my case 192.168.15.1
- Because the bridge should be transparent, we have to disable the DHCP server. Therefore find the DHCP section and check the Ignore Interface option
- Click Save & Apply
From now on your router is reachable with its new address 192.168.15.1. Because we disabled the DHCP server your computer will not get a new ip address automatically. You have to set it manually now:
- Give your computer a new ip address that belongs to the new subnet. I gave the ethernet adapter of my notebook the ip address 192.168.15.2
To resume configuration you have to reconnect to the router now.
- In your web browser go to http://192.168.15.1 which is the new URL of the router frontend
- Login in with username root and your password
6. Connect router to your WLAN
- In the menu go to Network/Wifi
- Click Scan in the upper right
- When the scan is finished choose the network you want to join and click Join Network
- In the appearing dialog enter the passphrase of the WLAN you want to join
- Click Submit
- Click Save & Apply
 If everything went well, your router should now be connected to your network have access to the internet now. This can be checked easily:
- Go to Network/Diagnostics
- Click on Ping
If the ping was successful it should result in something like shown on the right.
7. Install relayd on router
- With the SSH client of your choice (e.g. PuTTY) connect to your router using ip address 192.168.15.1. Rember to connect as user root. In linux for example you would have to connect like
ssh root@192.168.15.1
- Enter the password you set for OpenWrt in step 4
- Do an pkg update:
opkg update
- Install the LuCI package for the relay protocol so we can use it in the web frontend.
Important: Please note that the URL has to use http:// instead of https://opkg install http://downloads.openwrt.org/chaos_calmer/15.05.1/ar71xx/generic/packages/luci/luci-proto-relay_git-16.018.33482-3201903-1_all.ipk
- Activate relayd:
/etc/init.d/relayd enable
- End SSH session:
exit


8. Configure bridge via web GUI
- Open your browser and visit http://192.168.15.1 again.
- Login in with username root and your password
- In the menu go to Network/Interfaces
- Click Add new device
- In the Name of the new interface field enter stabridge
- In the Protocol of the new interface dropdown choose Relay bridge
- Click Submit
- In the Relay between networks section check lan: and wwan:
- Click Save & Apply
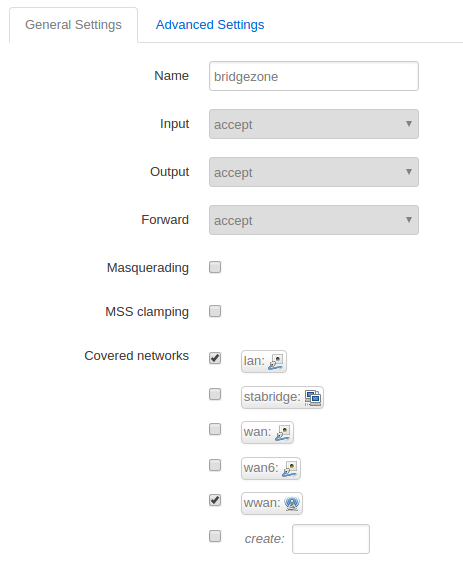
9. Adjusting firewall rules
- In the menu go to Network/Firewall
- In the Zones section Add
- In the Name field enter bridgezone
- In the Forward dropdown choose accept
- In the Covered networks section check lan: and wwan:
- Click Save & Apply
10. Restart router and test
- In the menu go to System/Reboot
- Click Perform reboot
Your setup is now finished. Any device that is connected to a port of the router (except the WAN port) should now behave like it would be directly connected to the LAN by wire.
To test this with my notebook I did the following steps:
- Disabled my wifi adapter
- Set my ethernet connection back to DHCP
The result is that my central DHCP server gave me a new ip address and I have full access to the internet and all devices in my local network.
Exactly what I wanted. This way I can extend my network to wire-only devices even when there is no network socket available.
Mission complete 🙂
Closing remarks
Remember that the configured router has the static ip address 192.168.15.1 which is very likely not reachable in the local network, e.g. because it has subnet 192.168.1.0/24. If you want to access the router itself, e.g. to make changes to the configuration like connecting to a different wifi network you would have to set the ip of your computer to 192.168.15.2 so it would be able to connect to 192.168.15.1. Additionally the router is configured to ask for an own ip address via DHCP. So you may lookup the address and connect to that ip. This works from any device in the network but the ones that are connected directly to the ports of the router.
Was this article helpful?
Consider buying me a coffee to keep my brain fueled 🙂
Thank you for the clear and concise explanation.
I’d like to have a wired instead of wireless bridge. I have network jacks upstairs and would like stronger wifi there. The wifi there should be the same SSID as downstairs.
So the main wifi cable modem downstairs is the DHCP server and the access point upstairs is transparent. Kind of like being in a company or hotel with the same wireless network everywhere.
This should be basically just a plain setup of an access point like described in the openwrt wiki: https://wiki.openwrt.org/doc/recipes/dumbap
Because it should work as an extension of your existing wifi be sure that
– SSID is exactly the same for the new access point
– wireless security values are exactly the same (e.g. encryption, cipher, key)
– if possible a different channel is used so access points don’t interfere too much with each other
I use this configuration at my home, too. Depending on the devices that use the wifi handover may not be perfectly seamless but for me it is a good and cheap solution to cover my whole house with good wifi.
Very helpful!
Step by step, simple and correct.
Thank you so much!
I have an exact same set up and it works great. The devices connected to relay bridge can see and ping and access the devices connected to primary routers. Devices on relay bridge can also access internet.
The only problem is that devices connected to primary routers can not see and ping or access the devices connected to this relay bridge.
I played around with firewall, including the settings in this but it did not help. I disabled the firewall and then stopped and then rebooted and in all such tries it did not work..
I then uninstalled the iptables, and then firewall and even now I have this problem.
Any pointers?
Thanks.
it was a great help to me. thank you very much!
Exactly what I was looking for, thank you!
Will probably pick one up tomorrow and give it a try. 🙂
So I need openwrt for this, right? I somehow expect that the range extender mode would share the wifi connection through the lan ports by default. 🙂
Well, to be honest: I don’t know if the original firmware has a range extender mode and if it would share the wifi connection to the clients. I like to use OpenWrt just because it has so many options and there is almost no wifi job it can’t do. So it’s a confirmed habbit for me to use an OpenWrt box whenever I have to do some wifi related job 🙂
Great guide , works flawlessly on tp-link 5600 v1 even in 5G mode against my Asus AC68U router . I have the bridge connected to an android TV and PS4 on another floor in the house , lot better throughput with the bridge setup versus using the built in WiFi of the ps4 (non pro version ) and androud telly .
I had to set Network->DHCP and DNS->DNS Forwording to 192.168.1.1 (main router ip) in order to get the diagnostics to ping, though using 8.8.8.8 worked just fine.
Thanks for the guide!
Thank you so so much. After hours of fiddling, and going through tutorials/FAQs/youtube videos. You tutorial was the most clear and most importantly, it just works!! I’ve also referenced your link in stackoverflow for future readers.
https://stackoverflow.com/questions/29555697/luci-openwrt-wifi-bridge-client-how-to-configure
Great tutorial, totally UN-ambiguous in every step!
Works flawlessly with LEDE 17 (“Reboot”).
As the author pointed out, better perform a factory reset before configuring the bridge.
Cheers,
F
Worked out great for me. Cheers!
this tutorial saved the day, the only procedure I found on the internet that worked on an asus AC51U. thanks!
Time to update this post. The firewall configuration page in Luci is now different. The configuration you list for setting the firewall to allow bridged traffic does not work.
You are right. Some steps have to be slightly adjusted. I just created a more up to date version of this guide: https://www.nerd-quickies.net/2019/08/20/setup-lan-wlan-bridge-with-openwrt-luci/
can i use one device as wifi->lan bridge AND “repeater” (wifi->wifi-bridge)?